
string keyword="버튼";
1. unity 게임 개발 숙련
(1) 플레이어 데미지 처리
플레이어에게 데미지를 줄 수 있는 캠프파이어를 생성해본다.

>>미리 준비되어 있던 프리팹.
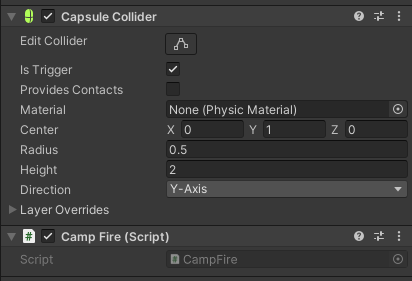
>>CampFire프리팹에 collider를 달아주는데, Is Trigger는 체크해준다.
Is Trigger에 체크를 해놓으면 충돌처리는 되지만, 물리적인 효과는 없는 것이다.
그리고 불에 닿으면 데미지를 줄 것이기 때문에 y값은 1, Height값을 2로 약간 높혀준다.
<CampFire>
 public int damage;
 public float damageRate;

 private List<IDamagable> thingToDamage = new List<IDamagable>();

 private void Start()
 {
     InvokeRepeating("DealDamage", 0, damageRate);
 }

 void DealDamage()
 {
     for(int i = 0; i < thingToDamage.Count; i++)
     {
         thingToDamage[i].TakePhysicalDamage(damage);
     }
 }

 private void OnTriggerEnter(Collider other) //닿을 때 데미지를 입힌다.
 {
     if(other.gameObject.TryGetComponent(out IDamagable damagable))
     {
         thingToDamage.Add(damagable);
     }
 }

 private void OnTriggerExit(Collider other) //닿지 않으면 데미지를 입히지 않는다.
 {
     if (other.gameObject.TryGetComponent(out IDamagable damagable))
     {
         thingToDamage.Remove(damagable);
     }
 }
<DamageIndicater>
public Image image;
public float flashSpeed;

private Coroutine coroutine;

public void Flash()
{
    if(coroutine != null)
    {
        StopCoroutine(coroutine);
    }

    image.enabled = true;
    image.color = Color.red;
    coroutine = StartCoroutine(FadeAway());
}

private IEnumerator FadeAway() //어딘가에서 Flash가 터지고 일정시간이 되면 감소를 하겠다.
{
    float startAlpha = 0.3f;
    float a = startAlpha;

    while (a > 0.0f)
    {
        a -= (startAlpha / flashSpeed) * Time.deltaTime;
        image.color = new Color(1.0f, 0.0f, 0.0f, a);
        yield return null;
    }

    image.enabled = false;
}
>>데미지를 입음과 동시에 화면이 빨갛게 깜박거리며 데미지를 입고 있다는 신호를 준다.
(2) 낮과 밤 구현
낮과 밤 구현을 위해선 낮에 비추는 빛과 밤에 비추는 빛 두가지로 나눠줘야 한다.

>>Moon을 하나 더 만들어준다.

>>마음에 드는 컬러로 지정을 해주고, 밤이니 Intensity(밝기)는 0.2정도, 그림자의 강도는 0.5정도로 설정.
<DayNightCycle>
[Range(0.0f, 1.0f)]
public float time; //하루의 시간을 얼마나 사용할 것인지
public float fullDayLength;
public float startTime = 0.4f;
private float timeRate;
public Vector3 noon; //자정의 각도를 얼마로 만들것인지

[Header("Sun")]
public Light sun;
public Gradient sunColor; //그라데이션을 넣겠다.
public AnimationCurve sunIntensity;

[Header("Moon")]
public Light moon;
public Gradient moonColor; //그라데이션을 넣겠다.
public AnimationCurve moonIntensity;

[Header("Other Lighting")]
public AnimationCurve lightingIntensityMultiplier; //환경광
public AnimationCurve reflectionIntensityMultiplier; //반사광

private void Start()
{
    timeRate = 1.0f / fullDayLength;
    time = startTime;
}

private void Update()
{
    time = (time + timeRate * Time.deltaTime) % 1.0f; //퍼센트로 쓸 것이기 때문에 1.0로 나눠준다.

    UpdateLighting(sun, sunColor, sunIntensity);
    UpdateLighting(moon , moonColor, moonIntensity);

    RenderSettings.ambientIntensity = lightingIntensityMultiplier.Evaluate(time);
    RenderSettings.reflectionIntensity = reflectionIntensityMultiplier.Evaluate(time);
    //빛이 바뀌는 것이고 프로젝트의 전체적인 환경을 바뀌는 것이 아니기 때문에 빛에 대한 조절을 하게 해줌.
}

void UpdateLighting(Light lightSource, Gradient colorGradient, AnimationCurve intensityCurve)
{
    float intensity = intensityCurve.Evaluate(time); //시간값을 주면 그 시간에 맞는 그래픽 값을 가져온다.

    lightSource.transform.eulerAngles = (time - (lightSource == sun ? 0.25f : 0.75f)) * noon * 4.0f;
    //noon은 90도 -> 낮과밤 사이클은 360도 이므로 4.0을 곱해준다. 그중 sun일 때 90도에 해가 떠있어야 하므로 0.25f(1/4지점)
    //반대로 달이 꼭대기에 있을 땐 0.75f 상태
    lightSource.color = colorGradient.Evaluate(time);
    lightSource.intensity = intensity;

    GameObject go = lightSource.gameObject;
    if(lightSource.intensity == 0 && go.activeInHierarchy)
        go.SetActive(false);
    else if(lightSource.intensity>0 && !go.activeInHierarchy)
        go.SetActive(true);
}
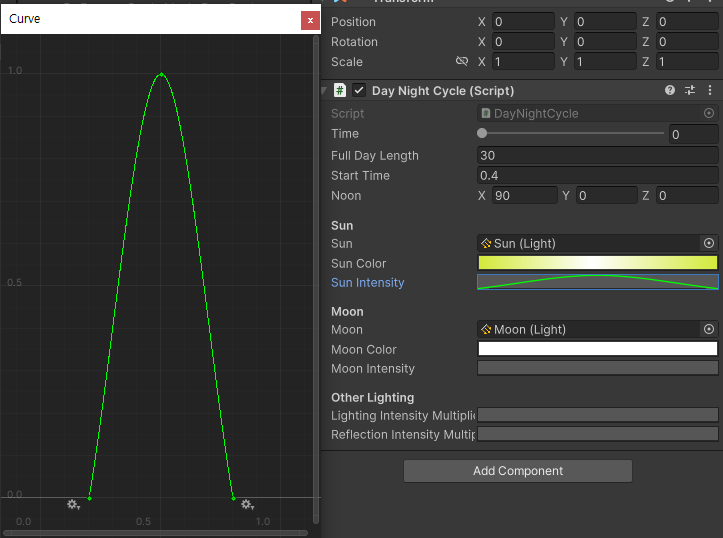
>>_DayNightCycle에 Sun과 Moon을 넣어주고 일단 해가 뜨고 지는 Curve를 설정해준다.
초록색 점을 누르면 다양하게 편집할 수 있고, 원하는 곳에 초록색점을 만들어서 커브를 구현할 수 있다.
>>나머지도 설정해주면 시간이 지나며 해가 뜨고 지고, 밤낮이 바뀌는 것을 볼 수 있다.
2. 개인과제_ATM
(1) Scene UI
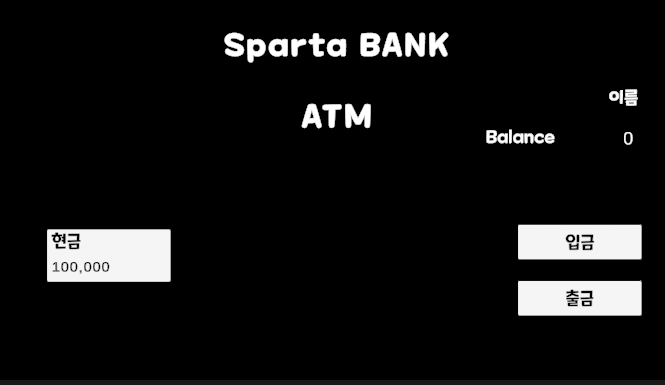
>>ATM 기본화면 UI를 만들었다.

>>입금을 눌렀을 때 나타날 UI
(2) button연결
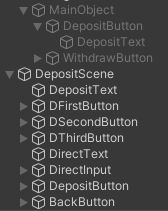
일단 입금버튼과 뒤로가기 버튼을 먼저 만들어 화면전환을 했다.
<DepositButton>
public GameObject MainObject;
public GameObject depositScene;

public void GoDeposit()
{
    MainObject.SetActive(false);
    depositScene.SetActive(true);
}
<DepositBack>
public GameObject MainObject;
public GameObject depositScene;

 public void GoMain()
 {
     depositScene.SetActive(false);
     MainObject.SetActive(true);
 }
SetActive를 활용해서 MainObject와 DepositScene을 컸다껐다 할 수 있다.
출금부분도 똑같이 UI를 구성하고, 스크립트를 만들어서 연결해줬다.
마무리
버튼 연결은 엄청 쉬운거였는데 오래돼서 기억이 안났다.....ㅜㅠ
그래도 찾아내서 연결시켜주고 잘 연결된걸 확인하니 이렇게 뿌듯할 수가 없었다.
입,출금은 UI뿐만 아니라 로직도 비슷해서 한쪽만 완성하면 나머지는 자동으로 완성된다!
내일은 입금 기능을 고민해보고 구현해봐야겠다!

.
.
.
with 용이
'개발자_뉴비일지' 카테고리의 다른 글
| 내일배움캠프 Unity 33일차 TIL - 배움의 즐거움 (1) | 2024.02.07 |
|---|---|
| 내일배움캠프 Unity 32일차 TIL - 첫 필수구현 (1) | 2024.02.06 |
| 주말 TIL_02 (1) | 2024.02.05 |
| 내일배움캠프 Unity 30일차 TIL - UI의 재미 (0) | 2024.02.02 |
| 내일배움캠프 Unity 29일차 TIL - 3D (0) | 2024.02.01 |


